Table of Contents
AIX upgrade
You can use smitty update_all only for upgrades within a version, ie. 5.3 TLx to 5.3 TLy, use a Migration install to go from 5.3x to 6.1x
AIX Upgrades within version (i.e TL9 to TL12)
Firstly, ensure all user and application processes are not running on the client, then go to the nim server.
vi /etc/exports and depending on the version of AIX you're upgrading, add the host to the end of the corresponding entry.
/export/nim/lppsource/aixv61tl5sp1 -rw,root=unixtest1-gbe:unixtest2-gbe
or
/export/nim/lppsource/aixv53tl12sp1 -rw,root=unixtest1-gbe:unixtest2-gbe
Then run exportfs -av to complete the procedure.
Go to the client server and mount the nfs exported directory on NIM server.
mount b0045nim:/export/nim/lppsource/aixv61tl5sp1/installp/ppc /mnt
Note: 'install/ppc' is the location of the install files, so needs to be added to the mount.
cd to the mount point and run smitty upgrade_all and set the following options (make sure to preview first), then hit Enter to start..
                                                        [Entry Fields]
* INPUT device / directory for software               .
  PREVIEW only? (update operation will NOT occur)     yes                                                   +
  COMMIT software updates?                            yes                                                   +
  SAVE replaced files?                                yes                                                   +
  AUTOMATICALLY install requisite software?           yes                                                   +
  EXTEND file systems if space needed?                yes                                                   +
  VERIFY install and check file sizes?                no                                                    +
  DETAILED output?                                    no                                                    +
  Process multiple volumes?                           yes                                                   +
  ACCEPT new license agreements?                      yes                                                   +
  Preview new LICENSE agreements?                     yes                                                   +
Examine the last few lines of /smitlog (ESC + > to jump to the bottom of the log) to see how much extra disk space is needed and that it will fit in the free space. Assuming it fits, run smitty update_all again and change the PREVIEW only and Preview License options to no, as below.
                                                         [Entry Fields]
  PREVIEW only? (update operation will NOT occur)     no                                                   +
  Preview new LICENSE agreements?                     no                                                   +
Once the upgrade has finished, do an oslevel -s to check the version info is correct, then run instfix -ic |grep ':-:' to check for any software that's at the wrong level. If you get this..
IZ01549:perl.libext:6.1.1.0:2.2.5.0:-:Support for future TL/SP
..dont worry about it, there just isnt a newer version..
Finally, remove or comment out the 'webserverstart' entry in /etc/inittab to prevent the newly installed webserver running. This will conflict with any application webservers. The reboot the server to finish.
bash-3.00# shutdown -Fr
AIX 5.3 to AIX 6.1
Ensure all user and application processes are not running, this example will upgrade Aix 5.3 TL9 to Aix 6.1 TL 5
Ensure you use the correct nim server for the ip address (of the server yo're trying to upgrade)
So, for a 10.84.xx.xx - use WM nim server (b0045nim), 10.87.xx.xx - use LN nim server (b0028nim) etc
From Nim server, ping the server you are about to upgrade (note the ip address for later)
ping aixtemp-gbe
PING aixtemp-gbe: (10.87.48.79): 56 data bytes
64 bytes from 10.87.48.79: icmp_seq=0 ttl=254 time=1 ms
64 bytes from 10.87.48.79: icmp_seq=1 ttl=254 time=1 ms
bash-3.00# lsnim -l aixtemp-gbe
0042-053 lsnim: there is no NIM object named "aixtemp-gbe"
bash-3.00# cd /opt/support/nim

bash-3.00# ls -lart
total 176
-rwxr--r--    1 root     system          104 13 Feb 2007  nim_delmach.ksh
-rwxr--r--    1 root     system          342 26 Jun 2007  nim_defmach.ksh
-rwx------    1 root     system          109 05 Jul 2007  rcp_mksysb_From_b0028nim.ksh
-rw-------    1 root     system            0 05 Jul 2007  nohup.out
-rwxr--r--    1 root     system          700 17 Sep 2008  nim_install_53-TL5.ksh
-rwxr--r--    1 root     system         1073 16 Apr 2009  nim_install_61.ksh
-rwxr--r--    1 root     system          847 22 Apr 2009  nim_install_53-TL6SP5.ksh
-rwxr--r--    1 root     system          695 22 Apr 2009  nim_rte.ksh
-rwxr--r--    1 root     system          125 06 Jan 09:24 oslevel.ksh
drwxr-xr-x   29 root     system         4096 21 Jun 12:19 ..
-rwxr--r--    1 root     system         1085 30 Jun 12:25 nim_install_61tl5.ksh
drwxr-xr-x    2 root     system         4096 30 Jun 12:25 .
-rwxr--r--    1 root     system          707 30 Jun 12:26 nim_rte.v61tl5.ksh
Run the following script, along with server name & ip address
./nim_defmach.ksh aixtemp-gbe 10.87.48.79
bash-3.00# lsnim -l aixtemp-gbe
aixtemp-gbe:
   class          = machines
   type           = standalone
   connect        = shell
   platform       = chrp
   netboot_kernel = mp
   if1            = net1 aixtemp-gbe 0
   cable_type1    = N/A
   Cstate         = ready for a NIM operation
   prev_state     = ready for a NIM operation
   Mstate         = currently running

./nim_rte.v61tl5.ksh aixtemp-gbe

lsnim -l aixtemp-gbe
aixtemp-gbe:
   class          = machines
   type           = standalone
   connect        = shell
   platform       = chrp
   netboot_kernel = mp
   if1            = net1 aixtemp-gbe 0
   cable_type1    = N/A
   Cstate         = BOS installation has been enabled
   prev_state     = ready for a NIM operation
   Mstate         = currently running
   boot           = boot
   lpp_source     = aixv61tl5sp1
   nim_script     = nim_script
   spot           = aixv61tl5sp1spot
   control        = master
Connect to the server you're about to upgrade
ssh aixtemp-gbe

bash-3.00# oslevel -s
5300-09-02-0849
* Start Upgrade Process
Shut the partition to be upgraded down on the HMC.
shutdown -Fh
SHUTDOWN PROGRAM
Fri  2 Jul 17:32:51 2010
0513-044 The sshd Subsystem was requested to stop.

Wait for '....Halt completed....' before halting.
Error logging stopped...
Advanced Accounting has stopped...
Process accounting stopped...
Stopping NFS/NIS Daemons
0513-004 The Subsystem or Group, nfsd, is currently inoperative.
0513-044 The biod Subsystem was requested to stop.
0513-044 The rpc.lockd Subsystem was requested to stop.
0513-044 The rpc.statd Subsystem was requested to stop.
0513-004 The Subsystem or Group, gssd, is currently inoperative.
0513-004 The Subsystem or Group, nfsrgyd, is currently inoperative.
Start the partition up and set to boot to SMS, ensure a virtual terminal is connected.
Connect to HMC (of the Frame where your lpar is)
Select server, select cheverons, select Operations, Activate, Advanced
Select Boot Mode (drop down) select SMS - OK, OK
Get a console terminal (From Nim server)
ssh hscroot@hmc1
press[enter]
vtmenu
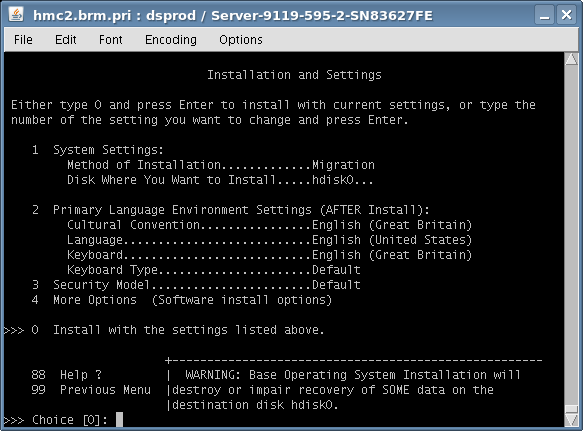
After the partition boots up, you should see a screen as below. The important thing to see is that the Method of Installation is set to Migration. You may need to change the Cultural Convention & Keyboard to English (Great Britain) currently option 43:-
Go into the following menu options to check/change settings;
2. Setup Remote IPL (Initial Program Load)
1. Interpartition Logical LAN U9119.FHA.83FF3E3-V13-C4-T1 0ea27415c204 (C4 = backup/admin network if there were more choices)
1. IP Parameters (on P5) OR 1. IPv4 - Address Format 123.231.111.222 (more options on P6)
3. Ping Test (on P5) 1. Execute Ping Test (on P5) - then back to main menu
1. BOOTP (more options on P6)
5. Select Boot Options
1. Select Install/Boot Device
6. Network
1. - Virtual Ethernet ( loc=U9119.595.836830F-V33-C4-T1 )
2. Normal Mode Boot
1. Yes
IBM text screen will appear. When the Migration menu appears, change the following options..
2 Change/Show Installation Settings and Install
Option 2 - Language and Environment Settings Change to English (Great Britain), should be option 43.
Option 4 - More Options (Software Install Options) Choose option 1 to disable System Backups, then 99 to go back Choose option 5 twice (Select Edition), and select 'Enterprise'
0 Install with the settings listed above. (to continue)
Make sure it looks likes this:-
Disks:  hdisk0...
Cultural Convention:  en_GB
Language:  en_US
Keyboard:  en_GB
Import User Volume Groups:  yes
Enable System Backups to install any system:  no
Remove Java 1.1.8 Software:  no
Selected Edition:  enterprise
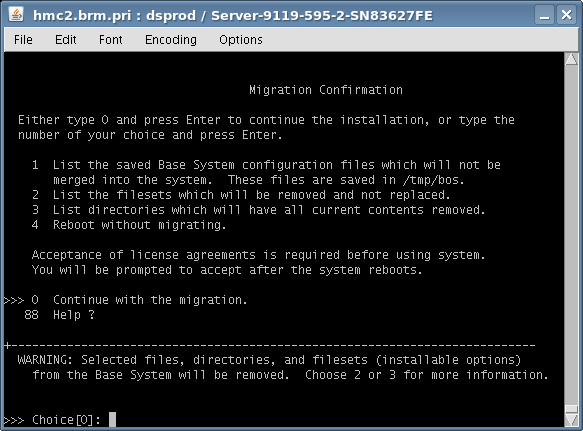
1 Continue with Install
If you are happy with the settings, confirm tham with 0 and the update will start.
After the system has rebooted, check the level and run instfix:-
bash-3.00# oslevel -s
6100-05-01-1016
bash-3.00# instfix -ic |grep ':-:'
IZ01549:perl.libext:6.1.1.0:2.2.5.0:-:Support for future TL/SP
Search /etc/inittab for http and websm, if you find anything - you should be able to delete as it was probably there from a very early clone and had caused some errors on startup of the lpar (confirm with Dave O).
Check if the rootvg has been mirrored correctly (see livedump below);
bash-3.00# lsvg -l rootvg
rootvg:
LV NAME             TYPE       LPs     PPs     PVs  LV STATE      MOUNT POINT
hd5                 boot       1       2       2    closed/syncd  N/A
hd6                 paging     96      192     2    open/syncd    N/A
hd8                 jfs2log    1       2       2    open/syncd    N/A
hd4                 jfs2       10      20      2    open/syncd    /
hd2                 jfs2       23      46      2    open/syncd    /usr
hd9var              jfs2       8       16      2    open/syncd    /var
hd3                 jfs2       64      128     2    open/syncd    /tmp
hd1                 jfs2       5       10      2    open/syncd    /home
hd10opt             jfs2       16      32      2    open/syncd    /opt
lg_dumplv           sysdump    8       16      2    open/syncd    N/A
lg_dumplv1          sysdump    16      32      2    open/syncd    N/A
nmonlv              jfs2       16      32      2    open/syncd    /nmon
optitmlv            jfs2       8       16      2    open/syncd    /opt/IBM/ITM
livedump            jfs2       2       2       1    open/syncd    /var/adm/ras/livedump

bash-3.00# lsvg -p rootvg
rootvg:
PV_NAME           PV STATE          TOTAL PPs   FREE PPs    FREE DISTRIBUTION
hdisk0            active            479         205         37..00..00..72..96
hdisk1            active            479         207         39..00..00..72..96

bash-3.00# mklvcopy -k livedump 2 hdisk1
bash-3.00# lsvg -l rootvg
rootvg:
LV NAME             TYPE       LPs     PPs     PVs  LV STATE      MOUNT POINT
hd5                 boot       1       2       2    closed/syncd  N/A
hd6                 paging     96      192     2    open/syncd    N/A
hd8                 jfs2log    1       2       2    open/syncd    N/A
hd4                 jfs2       10      20      2    open/syncd    /
hd2                 jfs2       23      46      2    open/syncd    /usr
hd9var              jfs2       8       16      2    open/syncd    /var
hd3                 jfs2       64      128     2    open/syncd    /tmp
hd1                 jfs2       5       10      2    open/syncd    /home
hd10opt             jfs2       16      32      2    open/syncd    /opt
lg_dumplv           sysdump    8       16      2    open/syncd    N/A
lg_dumplv1          sysdump    16      32      2    open/syncd    N/A
nmonlv              jfs2       16      32      2    open/syncd    /nmon
optitmlv            jfs2       8       16      2    open/syncd    /opt/IBM/ITM
livedump            jfs2       2       4       2    open/syncd    /var/adm/ras/livedump

bash-3.00# lsvg -p rootvg
rootvg:
PV_NAME           PV STATE          TOTAL PPs   FREE PPs    FREE DISTRIBUTION
hdisk0            active            479         205         37..00..00..72..96
hdisk1            active            479         205         37..00..00..72..96
Check if dsmcad id running, and start if ncessary
bash-3.00# ps -ef | grep dsm
    root 3932240 5439724   1 09:50:40  pts/0  0:00 grep dsm
bash-3.00# /usr/bin/dsmcad > /dev/null 2>&1
bash-3.00# ps -ef | grep dsm
    root 4849686 5439724   1 09:50:52  pts/0  0:00 grep dsm
    root 6225952       1   1 09:50:50      -  0:00 /usr/bin/dsmcad
Note: If it is NOT running, don't forget to add it to /etc/inittab
Remove Old Nmon & Add New Version
From the client lpar
Check & kill nmon process
ps -ef | grep nmon
root  5832828     1   0 00:00:01   -  0:04 /nmon/nmon12e_aix537 -f -s 300 -c 288 -m /nmon/nmon_data
kill 5832828
Tidy up directories structure
rm /nmon/nmon_data/*
Copy over nmon exe from b0045nim
scp b0045nim:/nmon/nmon12e_aix61 /nmon
Update crontab to run new aix61 version (crontab -e)
remove 			0 0 * * * /nmon/nmon12e_aix537 -f -s 300 -c 288 -m /nmon/nmon_data
Add			0 0 * * * /nmon/nmon12e_aix61 -f -s 300 -c 288 -m /nmon/nmon_data
Start NMON again for the remaining minutes up to midnight (every 5 mins - 12 per hour), E.g at 18:00 (6 hours left hence 72 executions required)
/nmon/nmon12e_aix61 -f -s 300 -c 72 -m /nmon/nmon_data


